The 3/4th battalion of The Queen’s (Royal West Surrey Regiment) was a territorial battalion that been formed in 1915 and went overseas in June 1917, joining 62nd Brigade, 21st Division, in August. Although the battalion spent some time in the line, the Battle of Broodseinde on 4th October 1917 was to be its first action.
On the night of 2nd-3rd October the 62nd Brigade relieved the 110th in the front line to the east of Polygon Wood. On the 3rd the men tried to carry out reconnaissance of the area but this was made difficult owing to the Germans occupying the nearby high ground.

Plan of attack for the Battle of Broodseinde
The action of 4th October was the third of General Plumer’s ‘bite and hold’ attacks, carried out to try and consolidate on the recent advances made and take the Broodseinde Ridge, thereby protecting the southern flank of the British line before the drive to take the Passchendaele Ridge. The 21st Division was to advance east and take the village of Reutel and the high ground overlooking it. 62nd Brigade was tasked with advancing almost 1,200 yards.
At 3am on the 4th the 3/4th Queen’s assembled with three companies in the front line, each with a frontage of about 85 yards. The strength of the battalion was 982 men.

Juniper trench
The battalion was attacking German positions on higher ground, so the Germans held the advantage and had a good view of the attacking troops. Between the battalion and its objectives were three ‘beeks’ or streams, and because of the shelling the ground was completely churned up, the war diary calling it an ‘impenetrable morass’. The rising ground towards the German positions was covered by barbed wire and there were ‘mebus’ (blockhouses/pillboxes) at the top of the high ground. These would hold 20-30 men, with machine guns and trench mortars covering the approaches.

The area attacked by the battalion. The Polygon Beek can clearly be seen
Zero hour was 6am, and as soon as the British barrage commenced the men moved up behind it. However negotiating a line of barbed wire caused delays and the men came under machine gun fire from the right flank. It also proved difficult negotiating the Polygon Beek and the marshy ground surrounding it, despite the use of mud mats and a few trench boards. Despite the confusion Juniper trench was reached and successfully assaulted. Many Germans were seen emerging, but in the dark it was impossible to tell if they meant to surrender or fight, and they were killed.
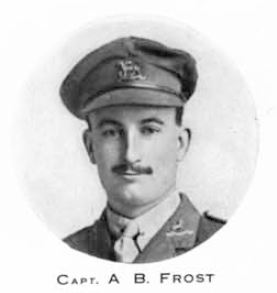
Lieutenant Arthur Byfield Frost. He was killed on 23rd March 1918 and is commemorated on Pozieres memorial
A German blockhouse was then encountered; a bombing party led by Lieutenant Arthur Byfield Frost attacked the structure and set it on fire with phosphorous bombs, an act for which Frost was awarded the Military Cross. The rest of this portion of the line was captured and the battalion consolidated its position and established Lewis Gun posts.
The Brigade war diary provides a more detailed account of the action which is worth quoting from, as it paints a vivid picture of the nature of the fighting, very different to the sanitised accounts that are often encountered:
The bayonet was freely used and large numbers of the fleeing enemy were shot with the rifle…One mebus was apparently set on fire by a phosphorus bomb and burnt furiously, the whole garrison being shot as they fled or burnt to death before they could emerge…
Prisoners were numerous and estimated by one commanding officer at 500, but the German dead far outnumbered these and were greatly in excess of our own casualties…
It is impossible to estimate with any accuracy the numbers of the enemy killed during the morning’s fight, but the numbers were far in excess of anything witnessed by the Brigade in the Battle of the Somme…
A gross case of treachery occurred during the attack near a mebu in Jupiter trench. A German officer surrendered and put up his hands. As Lieutenant Cooper of the 3/4th Queen’s went forward to take his surrender the German officer whipped out his revolver and shot Lieut Cooper dead. Before he could do more harm the German’s body was riddled with bullets from the rifles of the men who witnessed the treacherous shot.
On account of an inner compartment of a mebu reopening fire after the outer garrison had surrendered it was necessary to kill all the Germans in the post.
Bayonet work was impossible on the many Germans who fled to the rear as they ran without arms or equipment, but they offered good targets to the riflemen.
It also mentions an incident that occurred with the Padre:
A German rushed at the Reverend Tron and nearly tore his coat from off his back. The padre who is a bit of a boxer, repeatedly struck the German in the face until they broke apart. Unslinging his glasses, the astonished German thrust them into the hands of the astonished clergyman, and tended his surrender.
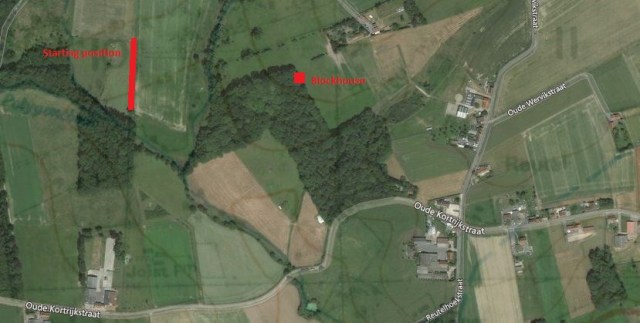
The area today showing the battalion’s starting point and the blockhouse bombed by Lieutenant Frost
The battalion had captured 200 prisoners, 15 machine guns, and 10 mortars. However losses had also been heavy: three officers and at least 84 men killed or died of wounds, and 250 wounded; of these 17 were officers including the Lieutenant Colonel, the Medical Officer, and the Padre. Total casualties amounted to a third of the battalion’s strength prior to the battle. Nearly 90% of those killed have no known grave and are commemorated on Tyne Cot memorial.
One of those who does have a grave is Private Harry Brown. In the 1911 census Harry was 16 and living with his widowed mother and brother and sister in Sutton, working as a gardener. His body was recovered in 1920, confirmed by his identity disc, about 2 miles from where the battalion had been in action.
Other casualties included:
 Lance Corporal John William Stracey of Carshalton, aged 21. His picture shows that he was a stretcher bearer. He is commemorated on Carshalton memorial.
 Private John Fletcher Boughey, aged 35. Educated at Brighton Grammar School, he worked for Child & Co private bank. He was also involved in the Church Lads Brigade at Ealing and Hanwell.
 Private Sydney Copeland Cleaver, of Canterbury, who worked for Lloyds Bank.

My grandad John Abernethy who lived with my family till his death in 1981 was a Lewis machine gunner in the 3rd/4th at this battle. I was the only person he ever talked about the war to but very briefly.
Thanks Ken, it must have been a horrific experience and I’m not surprised many veterans did not want to talk about it after the war
Pingback: JOHN Fletcher BOUGHEY | Wolverhampton's War